Visual Studio Code Setup For Remote Connections
Visual Studio Code (VSC) is an Integrated Development Environment (IDE) published by Microsoft which is available for MS Windows, MacOS, and Linux. VSC is available on all EECS Linux lab systems for direct desktop use. This document describes the setup procedure to configure VSC to access your EECS Linux files and use it to compile your lab projects on your personal MS Windows computer.
Prerequisites
- Mount your EECS Linux home directory as a network drive, see: manually-mounting-eecs-linux-home-directories
- Install VS Code
Microsoft Windows Clients
First-time SSH setup
- Ensure the prerequisites have been completed.
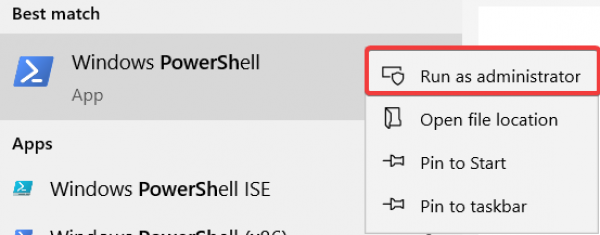
- Launch Powershell as administrator by typing “Powershell” into the Windows start bar, right-clicking on “Windows Powershell” and selecting “Run as administrator”.
- Then paste and execute the following:
Set-Service ssh-agent -StartupType Automatic
Start-Service ssh-agent
Get-Service ssh-agent
This adds the SSH Agent service to your system. - Open VSC and launch a terminal by pressing
Ctrl+`. - Run
ssh-keygento generate a key that will connect you to EECS machines. Press enter at the prompt for where to store the file, but add a passphrase to the key. EECS IT recommends the use of a password manager. - Find out what drive letter you mounted your network drive on. For example, the below image has its drive mounted on
L:
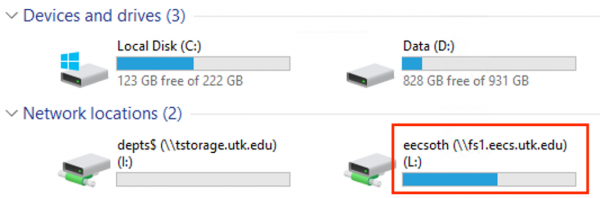
- Assuming you used
L:as well, runtype C:\%HOMEPATH%\.ssh\id_rsa.pub >> L:\.ssh\authorized_keys. If you chose a letter other than L, substitute the appropriate one.


Configuring SSH
- Run
ssh-addand enter your key's passphrase. The key will now be stored in the SSH Agent. Unless you restart your computer, you should no longer have to type in your passphrase when connecting to EECS Linux Systems. - Let's make sure everything is in place. Open up a new command prompt and attempt to log in to a Tesla/Hydra machine. You may be prompted about a fingerprint - type “yes” and hit enter.
- If everything was done right, you will be prompted to input your SSH key's passphrase, which will then log you in.
SSH Agent and ssh-add
After a reboot, runssh-add again and you will not have to re-enter your passphrase each time you want to connect to a Hydra/Tesla system. To verify your key is loaded, check if any keys are printed by the command ssh-add -l. If not, attempt to add your keys again. Setting up & using VS Code
- With the Ivanti Secure Access VPN connected, you should be able to open up VS Code and select a folder in your EECS directory through the network drive set up earlier. Select whatever folder within that you want.
- Tip: VSC has two types of settings - folder settings and user settings. Folder settings apply only to a particular workspace/folder, which means you'll have to re-apply them each time you change folders. If you want to be able to use a new workspace for each project, make sure you make changes to user settings rather than folder settings so they carry over.
- To make desired changes to general settings, open up your preferences (
Ctrl+,) and use the search bar to find what you want. For C/C++-specific settings such as your include path, open the command palette (Ctrl+shift+P) and search forC/C++ Edit configurations (UI). - To open a terminal, press
Ctrl+`. This terminal will behave exactly like a normal command prompt on your computer. In fact, you can even runsshas described in the previous section to connect your terminal to an EECS machine instead of your own.
Apple MacOS Clients
First-time SSH setup
- Ensure the prerequisites have been completed.
- Open the Terminal application.
- Run
ssh-keygento generate a key that will connect you to EECS machines. Press enter at the prompt for where to store a file, but add a passphrase to the key. EECS IT recommends the use of a password manager. - Run the following command:
cat /Users/$USER/.ssh/id_rsa.pub >> /Volumes/netid/.ssh/authorized_keys, substituting your netid appropriately.
Configuring SSH
- Run
ssh-addand enter your key's passphrase. The key will now be stored in the SSH Agent. Unless you restart your computer, you should no longer have to type in your passphrase when connecting to EECS Linux Systems. - Let's make sure everything is in place. Open up a new command prompt and attempt to log in to a Tesla/Hydra machine. You may be prompted about a fingerprint - type “yes” and hit enter.
- If everything was done right, you will be prompted to input your SSH key's passphrase, which will then log you in.
SSH Agent and ssh-add
After a reboot, runssh-add again and you will not have to re-enter your passphrase each time you want to connect to a Hydra/Tesla system. To verify your key is loaded, check if any keys are printed by the command ssh-add -l. If not, attempt to add your keys again. Setting up & using VS Code
- With Ivanti Secure Access connected, you should be able to open up VS Code and select a folder in your EECS directory through the network drive set up earlier. Select whatever folder within that you want.
- Tip: VSC has two types of settings - folder settings and user settings. Folder settings apply only to a particular workspace/folder, which means you'll have to re-apply them each time you change folders. If you want to be able to use a new workspace for each project, make sure you make changes to user settings rather than folder settings so they carry over.
- To make desired changes to general settings, open up your preferences (
⌘+,) and use the search bar to find what you want. For C/C++-specific settings such as your include path, open the command palette (⌘+Shift+P) and search forC/C++ Edit configurations (UI). - To open a terminal, press
⌘+`. This terminal will behave exactly like a normal command prompt on your computer. In fact, you can even runsshas described in the previous section to connect your terminal to an EECS machine instead of your own.
