Connecting To The Virtual Desktop Infrastructure (VDI)
This page covers connecting to a EECS Virtual Desktop Infrastructure (VDI) Windows 10 remote desktops.
VPN
If you are not using UTK's wired network or EDUROAM, you will first need to connect to the UTK VPN before you can connect. OIT has a a software download and instructions for setting up the VPN on their website.
VDI Connection using Windows or MacOS
On Microsoft Windows systems, VDI connections use the built-in Remote Desktop Connection program. Unlike a typical Remote Desktop Connection, you do not open the Remote Desktop Connection app prior to connecting to our VDI.
On MacOS, download the Microsoft Windows App app from the Apple App Store before attempting to connect to the VDI.
NOTE: You must be connected to the UTK VPN if you are off-campus.
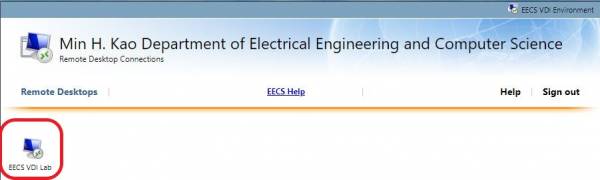
- You will be presented with a list of pooled systems available for your use. Click on the pool you'd like to use.
- There will be a Remote Desktop Connection file that downloads.

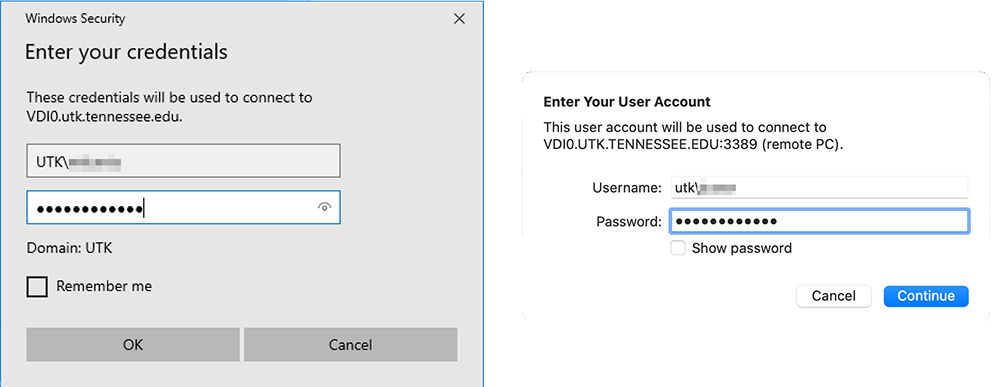
- Once you open the file, you should see a small window with a security notification. Verify that the “Remote computer” field reads
VDI0.UTK.TENNESSEE.EDU, then click Connect:

- Feel free to click the “Don't ask me again for remote connections from this publisher” checkbox to bypass this verification window in the future.
- Next, you will prompted to enter your login credentials. Use
UTK\netidas before. If you are using a Windows system on campus, you may only be prompted for your password.
Windows login shown on the left, MacOS on the right.
- Once you successfully enter your password, you will then be connected to a virtual desktop.
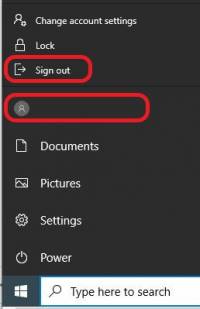
- When you're ready to disconnect from your session, you will need to Sign Out.


You can re-use the downloaded RDP file for future connections to the VDI.
VDI Connection using Linux
Connections to the EECS Virtual Desktop Infrastructure use the Remote Desktop Protocol (RDP). A number of RDP implementations exist for Linux. These instructions use FreeRDP which is available on all EECS IT-supported Linux desktops and virtual lab systems. It should also be available for easy install on most common Linux distributions. Check your Linux package manager for more information.
- Follow instructions 1 through 3 for Windows/MacOS access to download a connection file. You should now have downloaded a connection file with a name like
cpub-EECS_VDI_Lab-EECS_VDI_Lab-CmsTempVm.rdp. Please note that this may be in a “Downloads” directory. - Use the
xfreerdpcommand to connect to the VDI using the downloaded file as the first argument. For ease of connectivity, we recommend adding two command-line options./log-level:ERRORor/log-level:OFF(for minimum feedback)/u:UTK\\netid(where netid is your UTK NetID. Note the double backslash.)
- You will have to accept the offered certificate. Example session:
jruser:com1824 ~> xfreerdp Downloads/cpub-EECS_VDI_Lab-EECS_VDI_Lab-CmsTempVm.rdp /log-level:OFF /u:UTK\\jruser
Password:
Certificate details for 10.46.57.231:3389 (RDP-Redirect):
	Common Name: VDILAB-1.utk.tennessee.edu
	Subject:     CN = VDILAB-1.utk.tennessee.edu
	Issuer:      CN = VDILAB-1.utk.tennessee.edu
	Thumbprint:  b7:ef:90:5d:70:85:cf:3e:a6:e4:a2:19:21:68:f8:00:36:82:b0:a2:b4:0e:4f:47:13:39:f7:64:f8:9c:9e:40
The above X.509 certificate could not be verified, possibly because you do not have
the CA certificate in your certificate store, or the certificate has expired.
Please look at the OpenSSL documentation on how to add a private CA to the store.
Do you trust the above certificate? (Y/T/N) Y
Advanced Connectivity
The RDP connection file contains a number of options, some of which you may want to change (e.g. turning off multi-monitor support). Check the Microsoft documentation on RDP files for more information on the various settings.
FreeRDP has many command-line options to customize your session. Read the manual page or online documentation for all available settings. Some useful options you may want to add:
/size:WIDTHxHEIGHTor/size:percent%– Set the screen size for the remote desktop window, for example/szie:75%. Please note that the remote desktop window may still start in full-screen mode. Hit CTRL-ALT-ENTER to go to a windowed mode./dynamic-resolution– This option will allow you to resize the RDP window and have the remote system update its resolution accordingly. (May cause video distortions on older systems)/drive:name,/path– Redirects a local path on your Linux system as a drive on the remote server. Setnameto the name of the drive and/pathto the Linux path. Examples:/drive:home,/home/netid– (replacenetidwith your UTK NetID) Redirects your home directory as a drive in the remote Windows server:
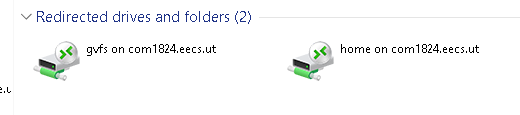
/drive:scratch,/local_scratch– redirect the local scratch directory on an EECS Linux desktop to the VDI.

File Storage
File storage is only permitted within your profile (e.g., My Documents, Desktop, etc…), and OneDrive. These VDI connections will revert to a prior state; therefore, anything that was stored elsewhere will be lost. Please note that locally stored data is not backed-up, so be sure to make your own backups. You can connect to Microsoft OneDrive from within the VDI desktops.
Troubleshooting
MacOS
I get an "Unable to connect" error with error code 0x204
Unfortunately, the Microsoft Windows App client for MacOS has a number of bugs. If you receive an error like the one below when connecting to the VDI, there are several troubleshooting steps you can take.

Try: Remove Temporary Folder
Try deleting the temporary/cache folder created by the Microsoft Windows App application. The folder's system path is: ~/Library/Group Containers/UBF8T346G9.com.microsoft.rdc.
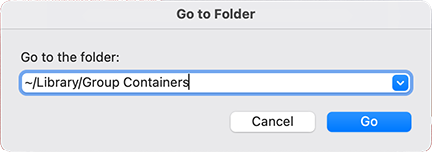
- Make sure the Microsoft Windows App application is not running.
- In the MacOS finder, hit ⌘-shift-g to open the “Go to Folder” dialog. Enter
~/Library/Group Containers
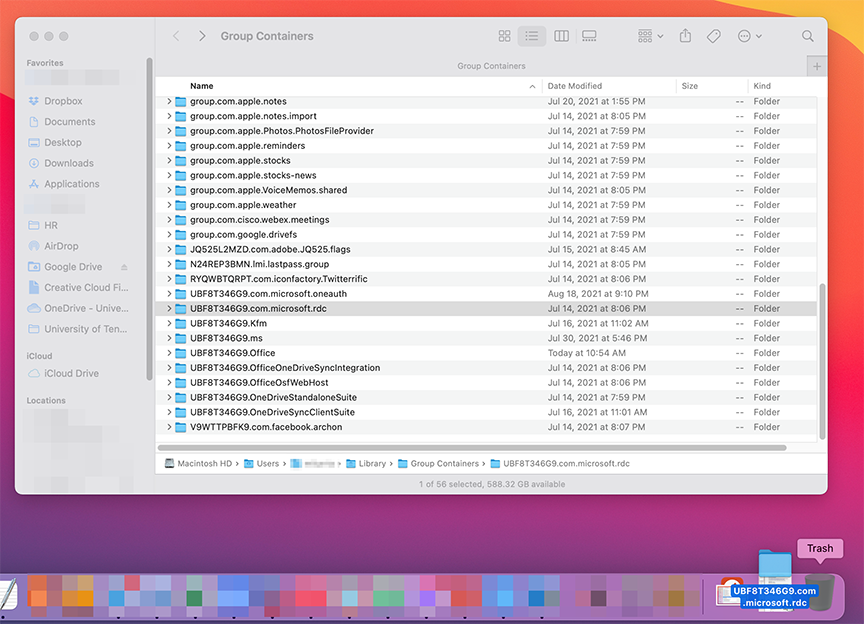
- Find the folder named
UBF8T346G9.com.microsoft.rdcand drag it to the Trash:


Notes:
- If you receive a message that no system is available when trying to connect, this is due to all desktops within that particular pool are currently in use. If you continually receive the same message after waiting several minutes, please contact our Help Desk.
- If you Disconnect your session, that session will be terminated after 2 hours. This will also cause you to lose any files that were not saved.