This is an old revision of the document!
SSH Access
This page covers remotely accessing EECS Linux machines using SSH. SSH enables you to get a secure shell on a Linux machine. If you are running Linux with X Windows System (most distros are), MacOS with XQuartz installed, or a Windows application with X Forwarding (such as MobaXterm), you can also use X Forwarding to forward application windows to your computer. Please also read EECS Linux Systems And Duo Authentication.
Secure Shell from Windows
Windows 10 (versions 1803 and up) and Windows 11 come with OpenSSH pre-installed, found at C:\Windows\System32\OpenSSH\ssh.exe. Using this tool, the instructions for connecting via SSH should be the same as with Linux or MacOS. However, since Windows historically has not featured a built-in SSH client, some alternatives exist.
Windows OpenSSH
- Open a PowerShell window (powershell.exe)
- You can now use the
sshcommand like on a Linux or Mac system.
If you wish to use X11-Forwarding, you will need to install an X11 server such as VcXsrv. Once you have an X11 server running, you will need to add -X -Y to your ssh command line to enable X11-forwarding. Please note that X11-Forwarding generally only works well over a local-area network and when accessing EECS systems from off-campus, may want to use VNC.
MobaXterm
MobaXTerm is a commercial terminal and X11 server product for Windows.
- Install MobaXterm. The Home Edition will be sufficient to connect to EECS systems.
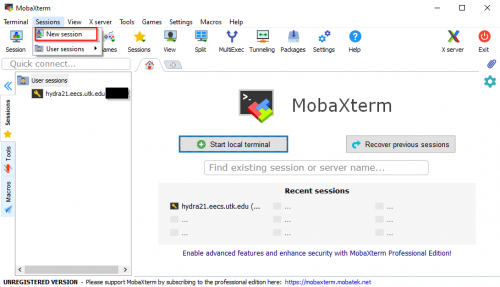
- Open MobaXterm.
- Select Sessions from the top ribbon and click “New Session”:
- Select the SSH tab.
- Enter the computer name in the Remote host field (e.g.,
comXXXX.eecs.utk.edu,hydraXX.eecs.utk.edu). Be sure to specify the entire host name including theeecs.utk.eduextension. - Check the Specify username box and enter your Netid in the field:
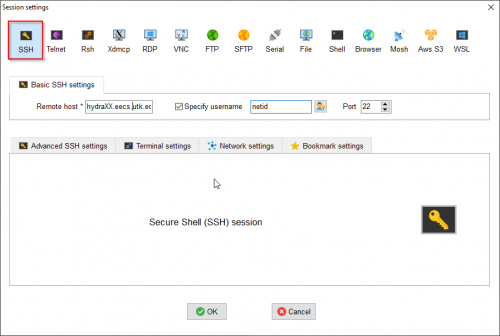
- Click OK.
The SSH session should now open and prompt for a password. Log in with your Netid password, and you should get a shell prompt and a file browser on the left. The session should be automatically saved on the left side of the screen next time you open MobaXterm. MobaXterm automatically has X11 forwarding enabled, so you should be able to run GUI applications as well.
PuTTY
Putty is a free and open-source terminal program with SSH support for Windows.
- Install PuTTY. Download the MSI installer (64-bit in most cases) and run it to get PuTTY installed.
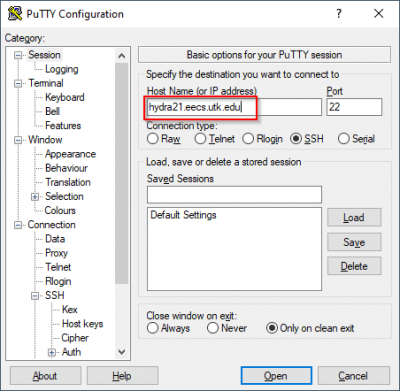
- Open PuTTY.
- Enter the computer name (e.g.,
comXXXX.eecs.utk.edu,hydraXX.eecs.utk.edu) in the Host Name field
- If you wish to save the connection, enter the name you want to use in the field under Saved Sessions and click Save
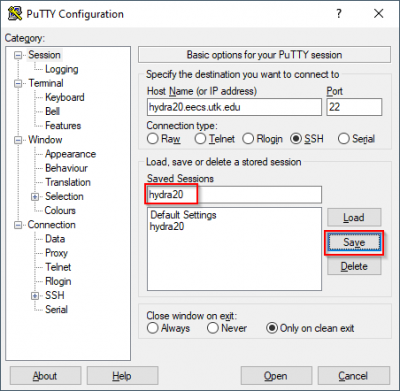
- Click Open
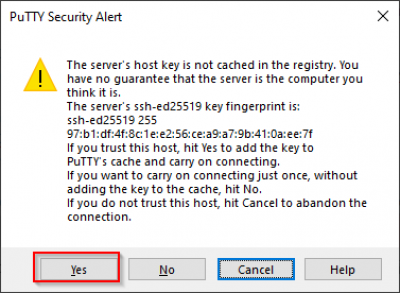
- Click Yes if prompted about the host key not being cached
- Enter your netid and netid password when prompted.
If you wish to use X11 over PuTTY, make sure you are running an X11 server such as VcXsrv. Then, before launching PuTTY, use the left sidebar and navigate to Connection→SSH→X11 and check “Enable X11 Forwarding” at the top.

X11 Forwarding from Windows
MobaXTerm and X11
MobaXTerm has a built-in SSH server which can be used for SSH X11-forwarding. This functionality should be turned on by default. You can double-check whether X11-Forwarding is enabled for your session in the “Advanced SSH settings” tab:

VcXsrv X11 Server
VcXsrv is a free and open-source X11 server for Windows. You will need to use an X11 server if you wish to use X11-Forwarding using a client without built-in X11 such as OpenSSH or Putty.
- Download the latest VcXsrv installer from https://sourceforge.net/projects/vcxsrv/files/vcxsrv/
- Run the installer and, once finished, launch the program. It will show up as “XLaunch” on your computer.
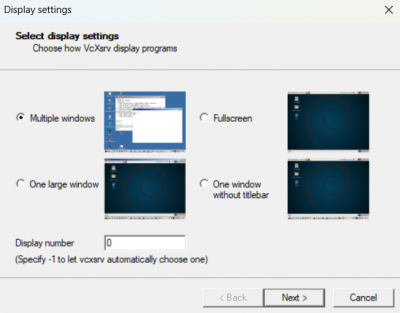
- Select “Multiple Windows” and set the “Display number” to 0, as shown below, then continue.
- Make sure “Start no client” is selected, then continue.
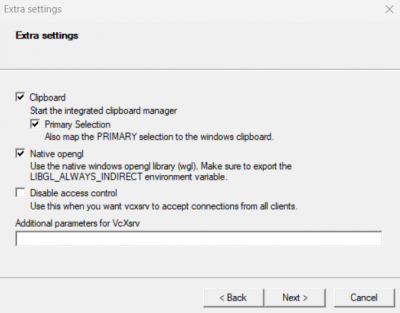
- On the “Extra settings” dialogue, leave all of the default options as shown below, then continue.
- You may be prompted to open firewall access for VcXsrv. Since this is unnecessary when using VcXsrv for SSH X11-forwarding, we recommend that you do not allow this.
- Before closing the configuration wizard, press “Save configuration”. This will create a shortcut on your desktop that you can run each time you wish to begin an X11 session.


Please note that the X11 server will run as a tray icon. If you wish to close VcXsrv, check your system tray in the lower right corner and right-click on the VcXsrv/X11 logo.
File Transfer
MobaXTerm
If you use MobaXterm SSH sessions, you automatically get a file transfer window when you login. However, if you set up a dedicated SFTP session, the DUO two-factor authentication prompt may be somewhat confusing. After starting a dedicated SFTP session, you will be prompted for a password as expected:
 If required, the system will also prompt you for DUO authentication but will omit the usual request to enter '1' for a push notification, etc.:
 .
.
You may now do one of the following:
- Enter '1' to be sent a push notification to your primary DUO device.
- Enter '2' to be sent an SMS with a passcode.
- Enter a passcode directly from your DUO mobile app or from a dongle.
WinSCP
WinSCP is a dedicated SFTP/SCP client you can use for file transfers between EECS Linux systems and your Windows computer.
- Install WinSCP. During install, it may offer to import PuTTY sessions if you have any saved.
- Open WinSCP.
- You should be prompted with a Login window.
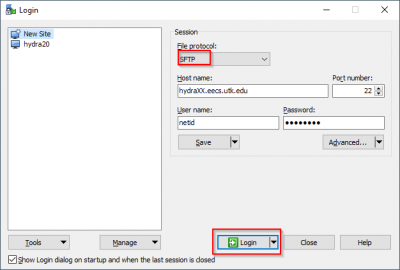
- Make sure that File Protocol is set to SFTP.
- Enter the computer name in the Host name field (e.g.,
hydraXX.eecs.utk.eduwhere XX is 0-30, make sure to include.eecs.utk.edu). - Enter your NetID and NetID password in the login fields.
- Click Login:
- You may be prompted for DUO authentication. See EECS Linux Systems And Duo Authentication for more information.
You should now have two file browsers to transfer files between computers.
SSH from Linux/MacOS
As both Linux and MacOS have a command-line SSH by default, it should be pretty simple to use.
Secure Shell
- Open a terminal
- Use SSH to connect
~> ssh netid@comXXXX.eecs.utk.edu
# replace comXXXX with the computer you are connecting, such as your computer or a lab computer (e.g., hydra20, tesla22)
- If it prompts to confirm that you wish to connect, verify that you are accessing the right computer and enter Y
Secure Shell w/ X Forwarding
- If you are running MacOS, install XQuartz or another X Forwarding application.
- Open a terminal
- Construct a command line with X Forwarding
~> ssh -XY netid@comXXXX.eecs.utk.edu
# -XY enable X forwarding
- Run a GUI program, and its window should be forwarded to your computer.
File Transfer
the two command-line methods for transferring files are scp, and sftp.
SCP
- Open a terminal
- Construct a command line to copy files
# From your machine to the one you are connecting to
~> scp /path/to/file netid@system.eecs.utk.edu:/path/where/you/want/to/copy
# From the other machine to your machine
~> scp netid@system.eecs.utk.edu:/path/to/file /path/to/save/on/your/computer
SFTP
- Open a terminal
- Open an interactive SFTP session:
sftp netid@system.eecs.utk.edu Connected to system.eecs.utk.edu. sftp> help Available commands: bye Quit sftp cd path Change remote directory to 'path' chgrp [-h] grp path Change group of file 'path' to 'grp' chmod [-h] mode path Change permissions of file 'path' to 'mode' chown [-h] own path Change owner of file 'path' to 'own' copy oldpath newpath Copy remote file cp oldpath newpath Copy remote file df [-hi] [path] Display statistics for current directory or filesystem containing 'path' exit Quit sftp get [-afpR] remote [local] Download file help Display this help text lcd path Change local directory to 'path' lls [ls-options [path]] Display local directory listing lmkdir path Create local directory ln [-s] oldpath newpath Link remote file (-s for symlink) lpwd Print local working directory ls [-1afhlnrSt] [path] Display remote directory listing lumask umask Set local umask to 'umask' mkdir path Create remote directory progress Toggle display of progress meter put [-afpR] local [remote] Upload file pwd Display remote working directory quit Quit sftp reget [-fpR] remote [local] Resume download file rename oldpath newpath Rename remote file reput [-fpR] local [remote] Resume upload file rm path Delete remote file rmdir path Remove remote directory symlink oldpath newpath Symlink remote file version Show SFTP version !command Execute 'command' in local shell ! Escape to local shell ? Synonym for help - Use the various commands to transfer files between your computer and the remote system.
Notes
In the above examples replace “system.eecs.utk.edu” with the appropriate host name, e.g. hydra5.eecs.utk.edu.
It is worth noting that, unless your computer is setup uniquely, your account on all EECS Linux machines should have the same filesystem. So you shouldn't ever have to copy files from hydra21.eecs.utk.edu to hydra0.eecs.utk.edu.
Various graphical SFTP clients are available for MacOS, including Cyberduck.